How to Customize Customer Statements in NetSuite (No Coding Required)
NetSuite's Basic Layout Designer lets you build clean, branded customer statements without writing a single line of code. Here's the exact step-by-step — including the one gotcha that trips up almost every admin.
Most NetSuite implementations go live with the default customer statement.
No logo. Generic columns. No brand. And buried somewhere in the footer — if you're lucky — an aging summary that's barely readable.
The statement is one of the most visible AR documents your business sends. Customers see it when balances are outstanding. Finance sees it during reconciliation. And if it looks like it was designed in 1999, that's the impression it leaves.
The good news: NetSuite's Basic Layout Designer lets you fully customize customer statements — fields, columns, aging, branding — without touching SuiteScript or Advanced PDF templates.
Here's exactly how to do it.
What's Actually in a Customer Statement?
Before diving into configuration, it helps to be clear on what a statement is supposed to do. Unlike an invoice — which is a request for payment — a statement is a summary document. It tells your customer: here's everything outstanding on your account as of today.
A well-built statement has four sections:
| Section | What It Shows |
|---|---|
| Company Info | Logo, address, contact details |
| Customer Details | Billing name and address |
| Transaction List | All open invoices, payments, credits |
| Aging Summary | Balances grouped by overdue period |
Done right, a statement reduces payment delays and cuts inbound "what do I owe?" queries. Done poorly, it creates confusion and erodes trust.
Basic Layout vs Advanced PDF — Which Do You Need?
NetSuite gives you two paths:
| Method | Best For |
|---|---|
| Basic Layout Designer | Visual configuration, no coding, quick field and branding changes |
| Advanced PDF/HTML Templates | Conditional logic, custom calculations, pixel-perfect formatting |
For most NetSuite admins, Basic Layout is the right starting point. It handles branding, field configuration, aging display, and column layout — which covers 80% of what businesses actually need.
Only move to Advanced PDF/HTML when you need dynamic content or formatting that the visual designer can't support.
Step 1 — Navigate to Transaction Forms
Go to Customization → Forms → Transaction Forms.
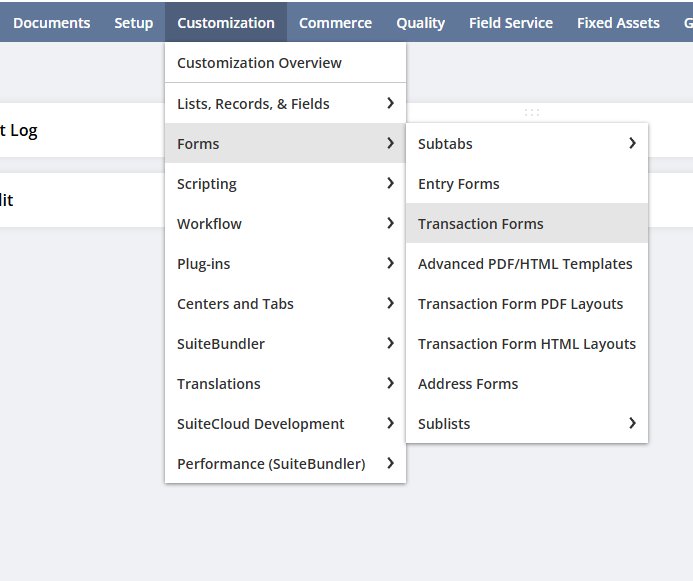
Find the Standard Statement row in the list and click Customize. This creates your own copy to work from — the standard form stays untouched.

Give your form a clear name like Custom Statement so your team knows exactly what it is.
Step 2 — Set Printing Type and Configure Header Fields
Inside your form, set Printing Type = BASIC and choose Standard Statement Layout as your PDF Layout.
Then go to the Header tab. This controls what appears at the top of every statement page. Enable fields using the Print/Email checkbox.
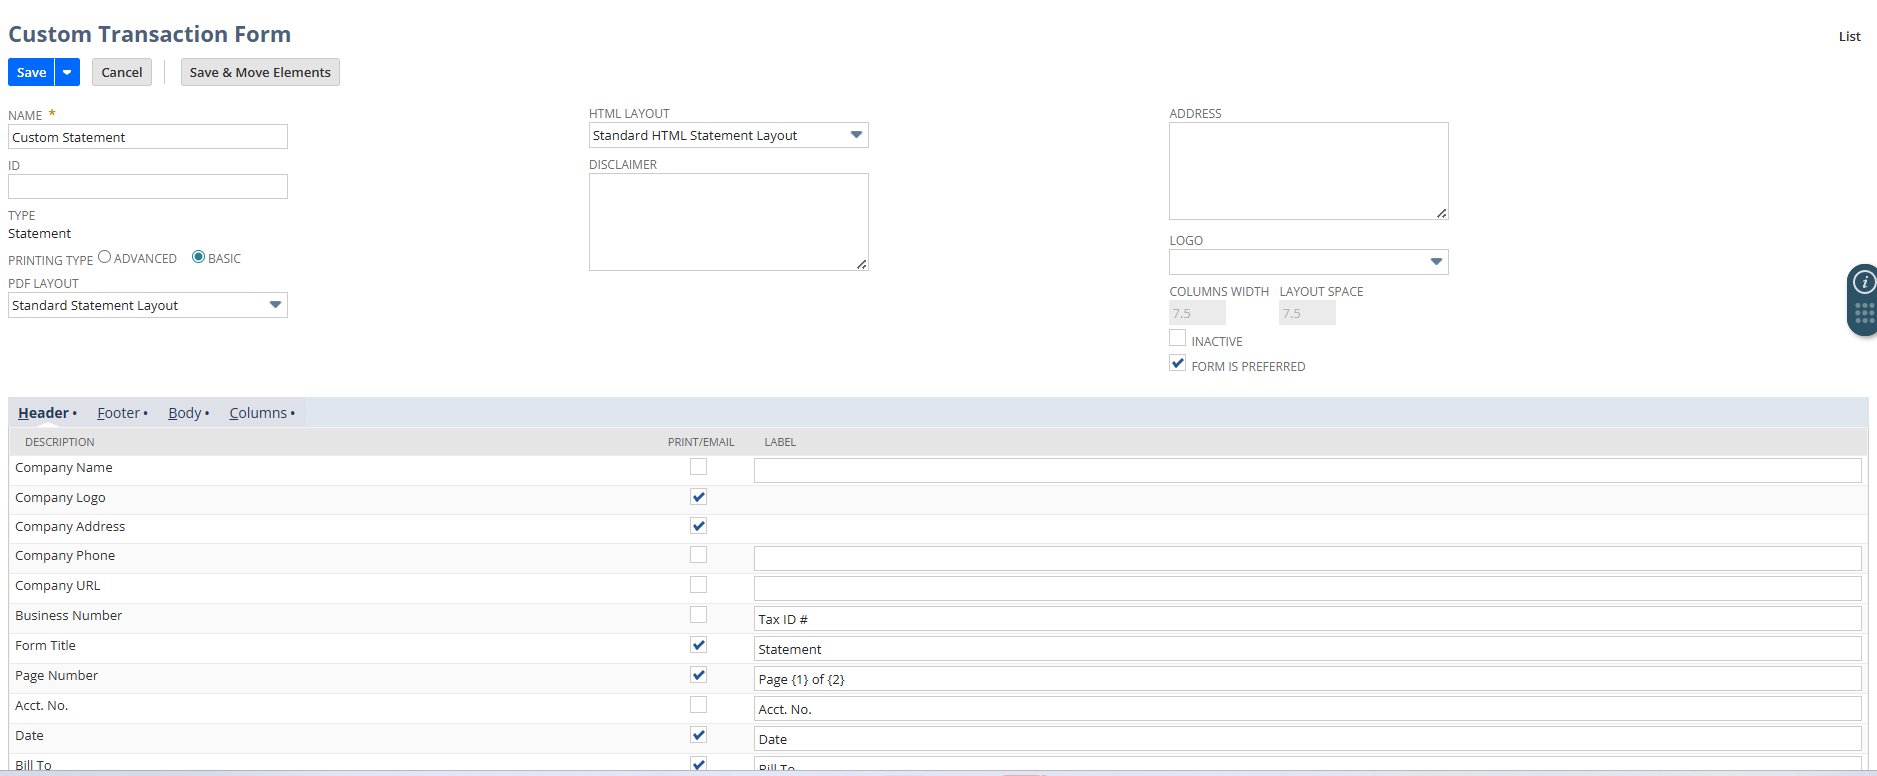
The fields worth enabling for almost every business:
| Field | Why It Matters |
|---|---|
| Company Logo | Brand recognition — always enable this |
| Company Address | Contact and mailing information |
| Form Title | Prints "Statement" as the document heading |
| Page Number | Essential for multi-page statements |
| Date | Statement run date |
| Bill To | Customer billing address |
Keep it clean. Only enable what the customer actually needs to act on the statement.
Step 3 — Configure the Aging Summary (Footer Tab)
The aging summary is the most strategically important section of any customer statement. It tells your customer — and your collections team — exactly how overdue each balance bucket is.
Go to the Footer tab and enable all aging fields.
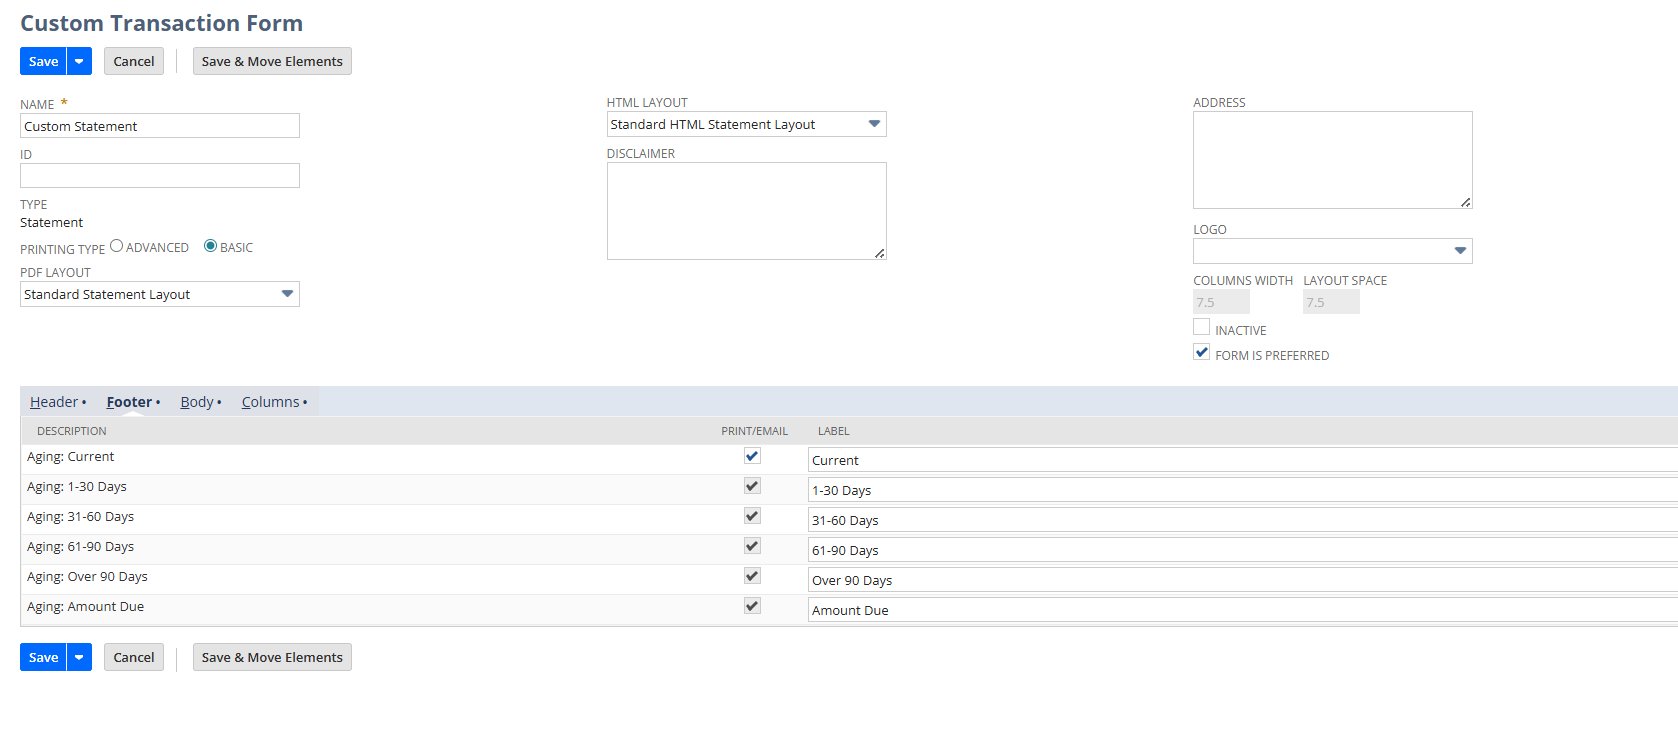
The standard buckets are:
| Bucket | What It Signals |
|---|---|
| Current | Not yet due |
| 1–30 Days | Slightly overdue — gentle nudge territory |
| 31–60 Days | Follow-up required |
| 61–90 Days | Escalation likely needed |
| Over 90 Days | At-risk — escalate immediately |
A visible aging summary removes ambiguity. Customers can't claim they didn't know what was overdue, and your AR team has the same picture in a single glance.
Step 4 — Configure Transaction Columns
The Columns tab controls what appears in the main transaction table — the core data your customer reads line by line.
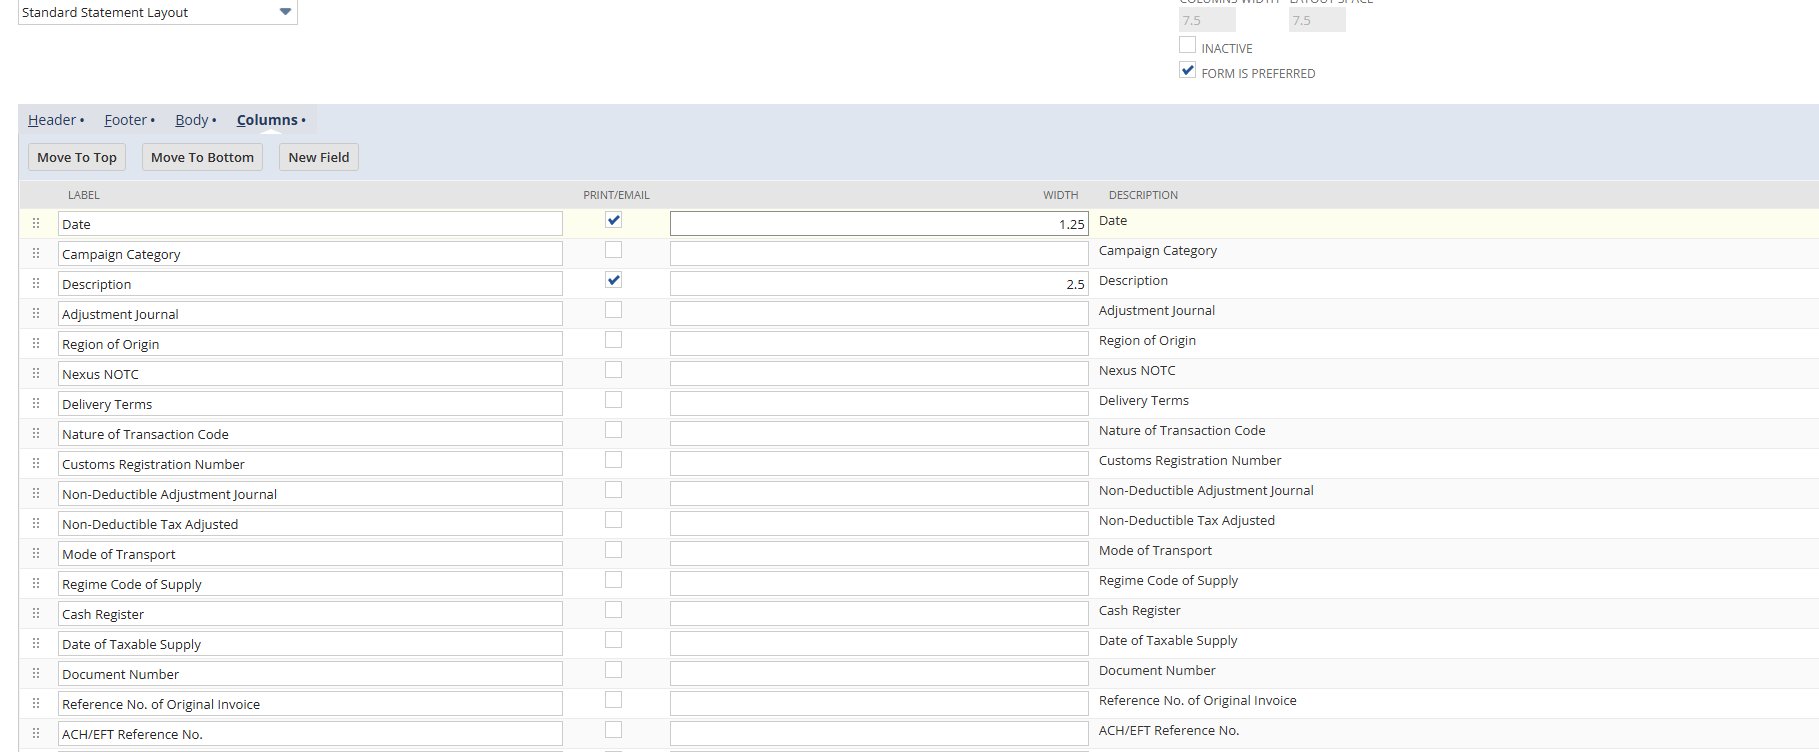
Enable the fields your customers need and set column widths deliberately. A wider Description column prevents text truncation, which is a small detail that makes statements significantly more readable.
Standard columns to enable: Date, Description, Reference Number, Amount.
Step 5 — Customize the PDF Layout
Now go to Customization → Forms → Transaction Form PDF Layouts.
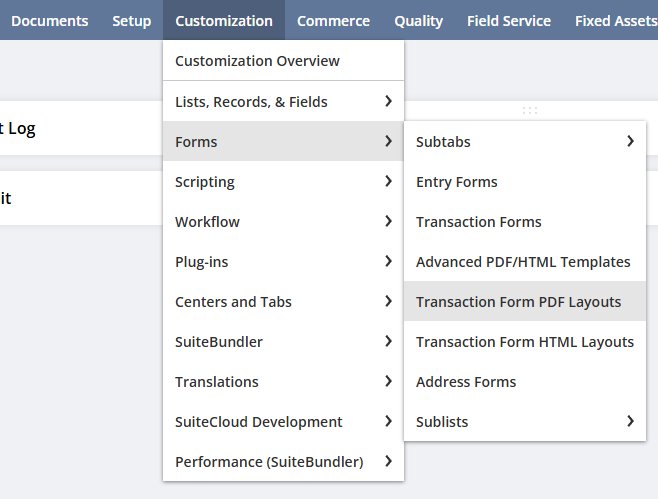
Find the Statement layouts in the list and click Customize on Standard Statement Layout.

The Layout Designer gives you a visual canvas to position every element — logo, company info, Bill To block, columns, aging footer. You control size, position, font, and color settings visually.
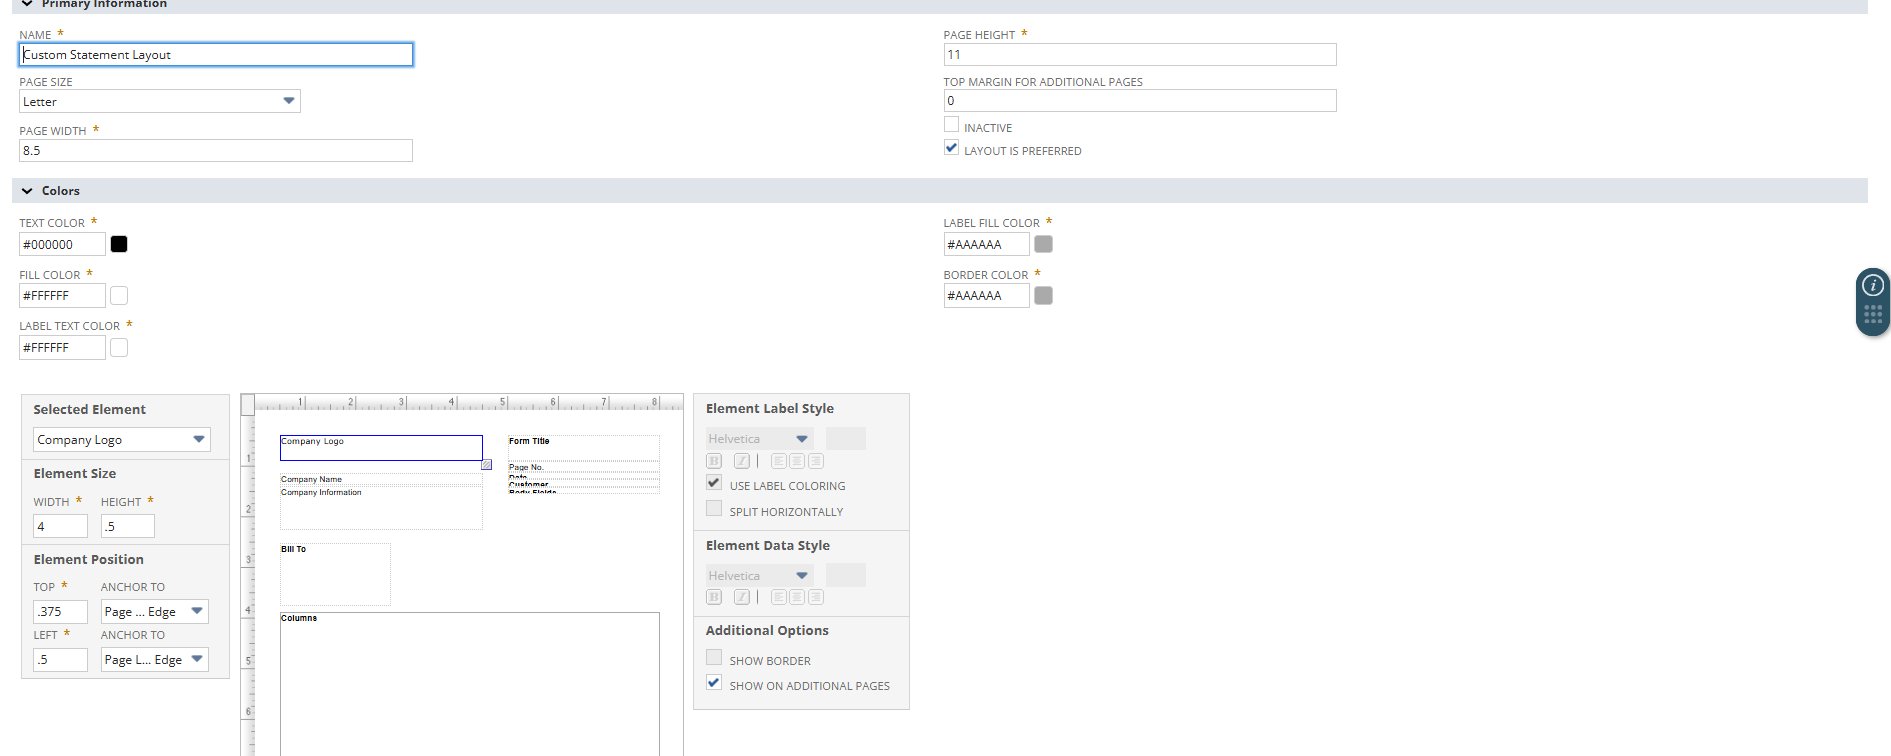
The Colors section at the top lets you set Text Color, Fill Color, Label Fill Color, and Border Color — enough to match most company brand palettes without any code.
The #1 Gotcha That Trips Every Admin
You've built a custom field. You've set up your layout. You go to add the field to the statement — and it's not there.
Here's exactly why.
When creating a Custom Entity Field, you must explicitly check the "Print on Statement" option inside the Applies To tab. Without it, the field exists on the customer record but is completely invisible to the statement layout designer.
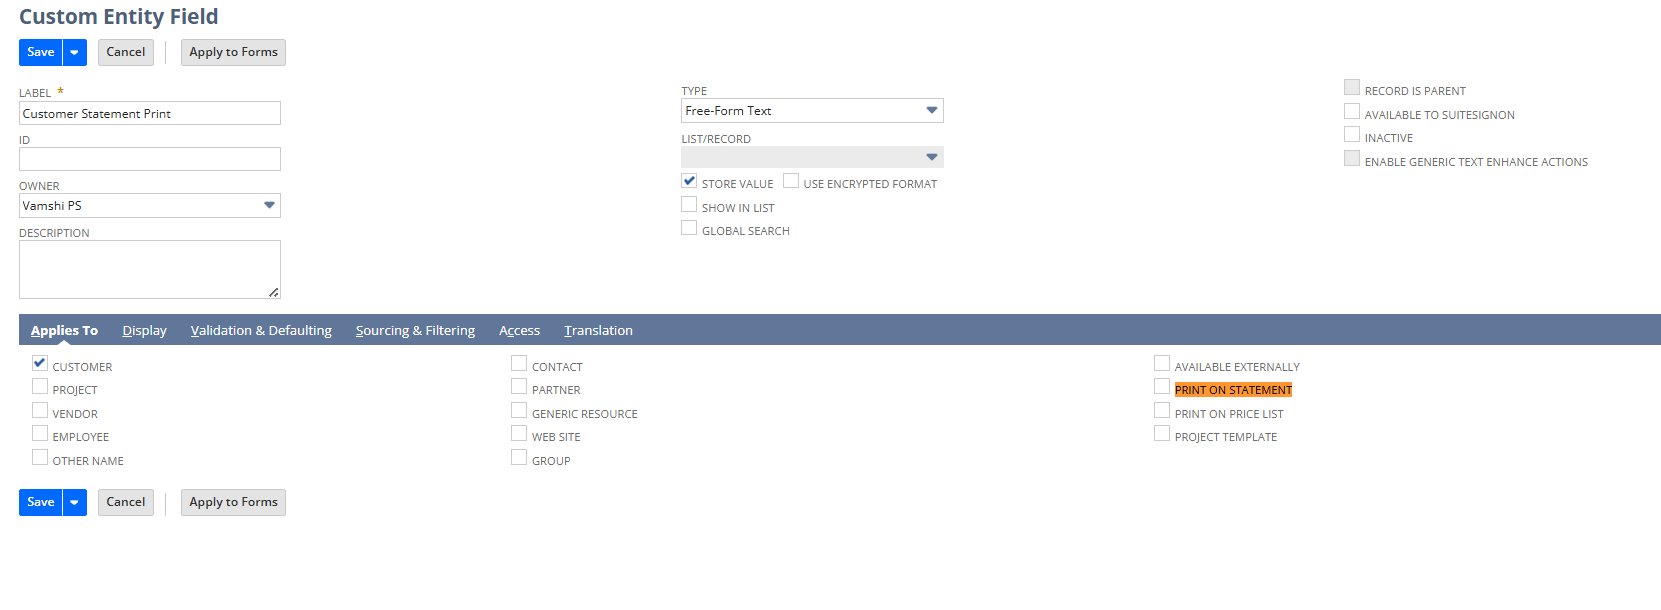
Navigate to Customization → Lists, Records, & Fields → Entity Fields. Find or create your field, go to the Applies To tab, and check Print on Statement.
Once enabled, the field becomes available under Printing Fields → Body or Printing Fields → Columns.
Pro tip: Enable "Print on Statement" by default on any custom entity field you create. It costs nothing and saves a frustrating debugging session later.
Generating the Statement
Once your form is saved and marked as preferred, generating a statement is two clicks. From any Customer record, go to Actions → Generate Statement.
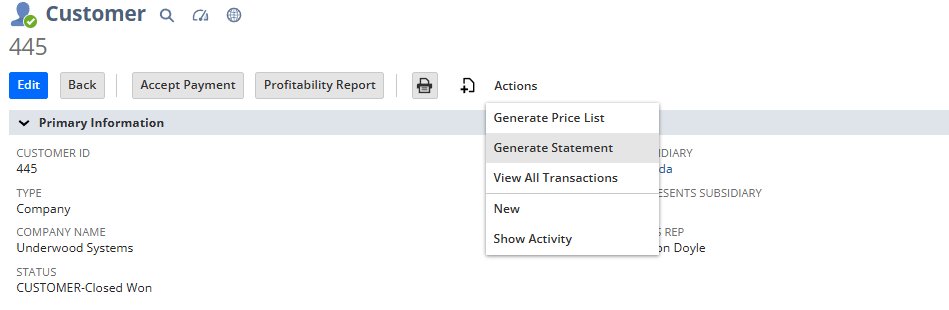
On the Print Individual Statement screen, set your date range, choose whether to show only open transactions, and — critically — select your Custom Statement form from the Form dropdown.
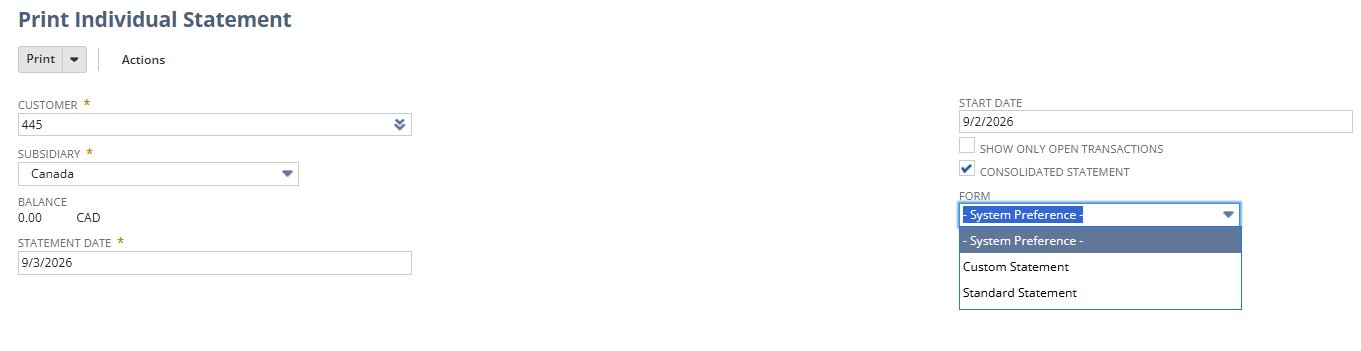
Your customers now receive a clean, branded, fully configured statement every time.
When to Stick with Basic vs Move to Advanced
| Use Basic Layout When… | Consider Advanced PDF When… |
|---|---|
| You need logo and branding | You need conditional formatting |
| Standard transaction columns are enough | You have custom calculation logic |
| Aging summary display is the goal | Layout varies by customer or subsidiary |
| Quick changes without dev involvement | A developer is available and the requirement justifies it |
What Actually Changes
A well-configured customer statement does three things your AR team will feel immediately:
Fewer inbound queries. When customers can see exactly what's outstanding, broken down by aging bucket, they stop calling to ask.
Faster payments. Clear statements with visible aging summaries create natural urgency. Customers know what's overdue without your team having to spell it out.
Audit confidence. When every statement follows the same format, with the same fields, generated from the same ERP data — your AR process has integrity built in.
The Full Checklist
Here's the complete configuration path from start to finish:
- Customization → Forms → Transaction Forms — Customize the Standard Statement form
- Set Printing Type = BASIC, choose your PDF Layout
- Header tab — enable logo, address, title, date, Bill To, page number
- Footer tab — enable all aging buckets
- Columns tab — enable Date, Description, Reference Number, Amount; set widths
- Customization → Forms → Transaction Form PDF Layouts — Customize the Standard Statement Layout
- Use the Layout Designer to position elements and set brand colors
- For any custom field: Entity Fields → Applies To → check "Print on Statement"
- Mark your form as preferred so it's always the default
NetSuite administration work like this is part of what we do — ERP consulting focused on implementations, customizations, and making NetSuite actually work for your business. Get in touch if you'd like to talk through your setup.
Found this useful?
Let's talk about your ERP project.